Pages

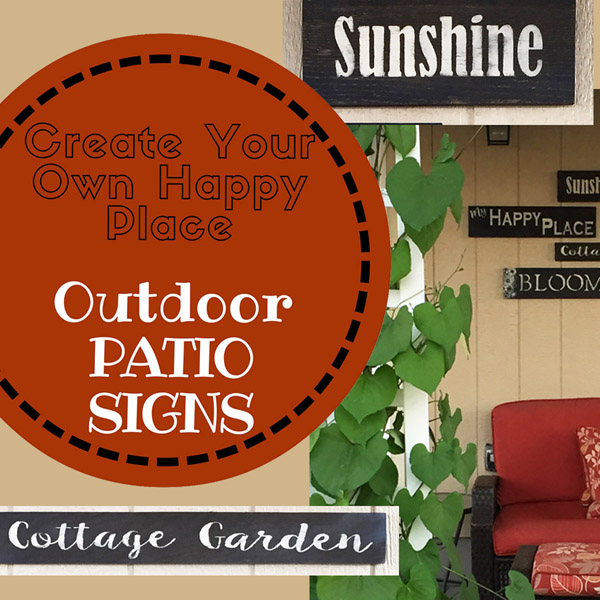
Create Your Own Little Happy Place with some DIY Signs


Create your own little happy nook with some DIY Signs. We all need a place for ourselves. I created mine next to my newly planted Cottage Garden (it's a tiny garden now, but it'll grow). I love sitting out there and just enjoying the flowers and sunshine. You can create yours inside or outside - as long as it's a place you can go to and find relaxation and peace.

Start by picking a few phrases that make you smile. Little reminders or happy things that take you to a special cocoon inside a busy bustling world. This may take a few days - enjoy the process of identifying those words or phrases that give you a feeling of bliss. Then start creating your signs - here's the process I used...


Picked a bunch of random sized wood. I first stained the wood with a mixture of Tea/Coffee and then used a Vinegar/Steel Wool mix to Oxidize it (instructions here). You could also use any color of stain or paint.

Stencils - I cut out phrases on my Silhouette (this gave me the most options of fonts and sizes). I also had some plastic letter stencils.  (You can also just purchase pre-made stencil phrases at any craft store). To position the stencils, I did some measuring and dividing (please, no more math) and then used a white Stabilo pencil (or any pencil that you can easily wipe off later), to mark the wood to help line up the stencil.

Taped down stencil with painters tape. To hold down some of the little inside edges of the letters I used my a clear tape runner.
I used Acrylic Paint (Titan Buff) and a make-up sponge. You don't need any fancy tools or daubers. The secret is to lightly dab your sponge into the paint and then lightly dab your stencils. Take your time and do several layers. This way the paint doesn't seep under the edge of the stencil and you get messy and blobby (yes, that's my technical term) edges. Patience and lightness is the key.


Once the paint is dry, I gently lifted the stencil off the wood. If needed, you can fix anything with a small paint brush. Once it was really dry, I gently wiped off the white guide marks.

Even though these will be hung in my covered patio, I still wanted to protect them from the elements. I used a product called NeverWet. After applying this, I sprayed several coats of clear matte finish and let them dry thoroughly.

To help determine the layout, I placed the signs on my floor, moved them around, and took pictures until I found the one I liked best. This helped me when I was outside hanging them - I just referred to the photo for the layout and spacing.

I'm experimenting with the hanging method.  I may add more signs in the future so I don't want to have nail marks all over the side of my home. I put a bunch (4-5 per sign) of Velcro Command Strips on the back of each of the signs. So with my photo of the layout, the signs and a level, I stuck them on the patio wall.


Project Steps

Select Happy Phrases
Pick and Stain Wood
Select and/or Cut out Stencil
Paint
Seal
Hang
Enjoy
Hope you find your very own Happy Place!
Love, Steph

Organize it Quick - 5 Steps


 Get your Mess Together & Throw Away Some of it
 Find a Box
 Paint Box
 Label Box
Put Stuff in Box

Start with a big old mess. 
Put it in a pile and discard anything that's old, not needed, outdated, etc. 
I wanted to organize my First Aid stuff and Medicines.

Find a box (the uglier the better - haha) that will hold your stuff. I had these from a thrift shop.
Pare down your stuff before finding the right box size.

Paint the box (a few coats of spray paint).

Label the box.
Design a fun label at Canva.com and print it out on Full Sheet Labels

Cut out the shape.

Put stuff in box.

Two cute organized boxes + more room in the drawer.

Happy Organizing!
Love, Steph

BEE Art...................Bee Happy

Bee Happy, Kind, Strong and True


Hope you'll BEE Happy this week!!! 
Love, Steph

Prints available in my online Etsy Shop

Plan Now: Set up an Emergency Book in 4 Steps


Why wait for the New Year to get all organized?
Pull this from your "I'll get around to it someday", "sitting on the back burner" list and "get 'er done". Tackle this project in just 4 steps and help yourself avoid drama, drama, drama when an emergency smacks you right in the face and you are UNPREPARED!


I thought about (and researched) what would I need to know if someone I loved got ill and I had to manage their life for a while. Or, in the worse case scenario, manage it after they're gone.
Especially with aging parents, this is so important.

Ask yourself...

What if something happened to you or someone you love?
Could you, your spouse, or someone else, step in and help with the day to day things?
Would you have access to the important info?
Would you even know where it was?

Wouldn't you rather think about and gather these things now,
instead of frantically searching for them later?


Setting up your Emergency Book

The ICE Checklist is a guideline with all sorts of things to think about when you're putting your Emergency Book together. Customize it to make it fit your life. You can keep it super simple with just the basics or take additional time to gather more details. Do What Works Best for YOU.

 The main thing to remember is to ask yourself, 
"what do I need to know if I couldn't ask
(my mom, dad, spouse, etc.)?"

 Download ICE Checklist


Your Emergency Book can be a simple notebook/folder/box. I played around with a few things but eventually ended up adding a few sections to the notebook that holds my Trust documents.


Step 1

Type up an Emergency List
Contact info for your immediate family/friends + accountant, lawyer, etc.
Contact info/Account Numbers/Passwords for Banking, Insurance, Mortgage, Home Services, Investments, Subscriptions, Social Media, etc.
 Safe Deposit Box List

Step 2

Important Papers
Keep copies of certain papers at home instead of in your Safe Deposit Box -
Medical Directives, Power of Attorney, etc

Step 3

Duplicate Keys
Gather all your duplicate keys (or have copies made) and label them.
As I had multiple keys, I put them in little snack bags, labeled them and
placed them all into a sheet protector in my notebook. 

Step 4

Wallet Contents
Copy all contents of your wallets. Throw them on the copier (front and back).
This is also helpful should you ever have your wallet stolen.


Add each of these components to your Emergency Book.


Another Option: You could also create your Emergency Book digitally. Just take photos/scan the important documents and wallet contents. Keys will need to be kept separately.
Keep the info secure on a USB drive, Evernote, etc.


So whether you choose a physical book or digital copy, make sure to KEEP IT SAFE.
This is very important should you choose to list confidential information such as passwords, social security numbers, banking and more. Password protect everything.

Once it's in a safe location, make sure the person you want to handle your things in an emergency knows where everything is and what the passwords are. 

That way, in an emergency, when your stress level is through the roof, you won't have to spend anxious moments trying to find important pieces of info.

So a little bit of planning now, a lot less stress later on.
I ended up creating one for both myself and my mom. As I am now managing so much of her accounts and bills, etc. I'm glad I pulled all this info together in one place.
 

Here's to less stress!  

Happy Organizing!

Love, Steph


Make Everyday an Excellent Adventure - New Art & a New Way of Living

When I left my corporate job three years ago, one thing I promised myself was to enjoy life more. 
To jump off the never ending, always busy, no time to breathe, treadmill that unfortunately is most of our lives. 
Rest, relaxation and fun was something you tried to fit in when the work was done (and it never was)

 Oh the Places You'll Go - Dr. Suess

Blessed are the curious for they shall have adventure.

Happiness is a journey, not a destination.

One's destination is never a place, but a new way of seeing things - Henry Miller


So I have since decided to try and make each day an Excellent Adventure. And make sure I schedule fun on my calendar, along with work, not just wait for "when things aren't so busy"

And you don't have to go anywhere to have an adventure. Adventures are big and small. Sometimes it's hitting the road to discover new places and sometimes you discover something in your own backyard or in a book or in a moment. It's just a matter of looking.

I would have loved to have learned this when I was getting ready to head off to college or start a new job. When our focus gets smaller and smaller until it's only the size of studying for our next exam or working on that next project, or staying later and later and later at our job, just to play catch up. (Hindsight is always 20/20). 

I worked on this piece on and off for several months and just hung it on the wall in my office 
 (to help remind me to get out of my office)


Hope you have an excellent adventure this week!
Love, Steph

Excellent Adventures in Savannah - 13 Things to See, Do and Eat

Went back in time for a few weeks as we traveled on an Excellent Adventure to Savannah, Georgia. It's a place we had never visited, but always wanted to. One of my former co-workers lived there for a few years and she sent us an insider's view of this wonderful city.

Architecture, History, Southern Food, Trees, 22 Park Squares, Southern Hospitality, Gardens, Food, Food and more Food. Did I mention Food? Such a treat to experience all these amazing sites.  There are too many to fit into one page, but here are some of our highlights.  
And yes, I picked up my old southern accent in just a few hours - how ya'll doing today?

13 Things to See & Do & Eat in Savannah

Wormsloe Historic Site
400 Live Oak Tree Canopy 1 1/2 miles long. Planted over 100 years ago to celebrate the birth of a baby. They're called Live Oaks because they only shed a portion of their leaves twice a year. The "Spanish Moss" you see hanging from the trees actually isn't Spanish, nor a moss. It's part of the pineapple family (so weird) and gets its nutrients from the air and rainfall. Both the trees and the moss are protected.

Davenport House 
A favorite tour with a very knowledgeable docent who shared great stories of the history and remarkable architecture. Look at the curved staircase and newel post. The floor you see is actually a "floor cloth". To protect their wood or marble floors, they would commission an artist to duplicate the floor on a waxed canvas cloth that was put over the actual flooring.
Bonaventure Cemetery
Eerie and beautiful at the same time. For any of you who saw the movie, Midnight in the Garden of Good and Evil, this is where part of it was filmed. The famous Bird Girl of Savannah Statue has since been moved to a museum.

St John the Baptist Cathedral
The oldest Catholic Church in the country. 

Forsyth Park
30 acres inside the Historic District.

Historic District
In 1955 much of Savannah was in danger of being demolished. Seven women got together to form the Historic Savannah Foundation and made it their mission to protect and restore over 350 homes.
 Look how these houses have two staircases. The ladies went up one side and the gentlemen, the other. (So no one could see the ladies ankles).

Mrs Wilkes Dining Room
If you want a taste of true southern food, this is the place. One of our favorite experiences. Like an old fashioned Sunday dinner on steroids. They're only open 3 hours each day during the week and they don't take reservations or charge cards (say that with a southern accent). What a memory - we waited in line for almost two hours (and it was so worth it). We chatted with our  neighbors in line and we all ate family style. We "passed" the bowls and bowls and bowls of food for the first 10 minutes of the meal and still didn't get to everything.

Paula Dean Store and The Lady & Sons Restaurant
Fried Green Tomatoes, Shrimp & Grits and SWEEEEEET Tea.
(that's my sweet momma next to Paula's picture)
Picked up a "Gooey Butter Cake" chapstick - fun!

Rocks on the Roof 
Some friends from my California days took us to this rooftop restaurant/lounge on top of the Bohemian Hotel with great views of the Savannah River. And we got to experience a true East Coast storm - haven't seen one of those in ages.

Mercer House & Museum
Famed home of musician, Johnny Mercer, who wrote songs such as Moon River, Too Marvelous for Words, Baby, it's Cold Outside, Tutti Fruiti and many more. Also featured in the movie Midnight in the Garden of Good and Evil based on a shooting in the house (they refer to it as the "incident").
 
The Olde Pink House
Build in 1771, this 16,000 sq ft Colonial home survived several huge fires in Savannah. It's been a home, a bank and also housed Union General York during the Civil War. It's called the pink house as the color of the bricks leaked through to the stucco causing it to turn pink. It's now a restaurant and was featured on the TV Show, The Best Thing I Ever Ate. And it's also haunted!

Great Food & Shopping
Zunzi's, Leopold's Ice Cream, Green Truck Pub, B & D Burgers, Byrd's Famous Cookies, Savannah Candy Kitchen, City Market & River Street and SO MUCH MORE>

A Trolley Tour
A hop on/off trolley tour is the best way to see the Historic District as parking is very limited and very crazy. We got a two day pass so we didn't have to rush and could eat at different restaurants, take time to explore the museums and homes and just hop on the trolley when we were done.
 

This visit is already a treasured memory.
Happy Exploring!
Love, Steph

DIY Easy Planter Stones - a simple project to brighten up any room

Plants are a beautiful accent to your home decor and really brighten up a room (as well as make the air cleaner). But sometimes the soil in a planter looks less than appealing. Even with new soil, it often looks a little dingy. 
(I know, I know... the dirt looks dirty -haha)


I love Mexican Beach Pebbles (although they're a lot bigger than pebbles). They're
smooth and are often used for walkways or patio-scapes. Got these at Home Depot for around $11 and will only use a small portion of the bag so I can do several projects with the one bag. They have a couple of stone sizes so select what works best for your planter. I chose a natural color but I've also seen them in white. The natural color is pretty enough but I wanted to ratchet it up a bit with a little paint.


Select the stones - I chose a variety of stone sizes (small, medium and large). 
For my 13" pot, I used 45 stones. Just make sure you have enough to cover the top of the dirt and add several extra stones so they can be stacked up in the planter to cover any open spaces.


 Wash and dry the stones to remove any dust and prepare the surface. I washed them inside a colander so it wouldn't scratch my sink and they were easier to move. When completely dry, start the painting.


Wanted to paint the stones to accent my decor colors so I chose a red. It was a little too bright so I mixed it with some raw umber to tone it down. I used acrylic paint, but maybe in the future I would just spray paint them as it was a little messy. Painted one side with a foam brush and placed them on an egg carton for drying. It took about 15-20 minutes drying time between coats. Did 2-3 coats.


Once finished, I sprayed the stones with two coats of clear acrylic spray paint.

Loved the final look! Such a simple thing, with a big return. 
I think I'll do this for my outdoor patio planters too.

Happy decorating.

Love, Steph

Collect Moments (not things), Gratitude is my Attitude and more - Sunflower Art

Sunflower Art with some of my favorite quotes and sayings -
 all to inspire a sweeter, more positive, joy-filled life.


 Hope your week is sweet!
Love, Steph