Simplifying and Soul Whispers

Beware the barrenness of a busy life. Socrates

Focus on being productive instead of busy. Tim Ferris

Never get so busy making a living, that you forget to make a life.

So many of us have busy, busy, busy lives.
Is your typical response to the question of "How are you?" an automatic response of "I'm So Busy."
We are surrounded by a culture that constantly says your life isn't good enough until it has more.
Busy is better. Do more, Work more, Buy more.
MORE, MORE, MORE.

Do you feel that you have so much on your plate that you can't enjoy or appreciate what's happening in the moment? You're always in emergency mode. You know it's too much.
You know you feel overwhelmed. You know you want something better. 

In my old job I use to joke that I lived in the future, because I was always working on projects months away and planning and organizing things for future days. I rarely thought of the current moment, only of future moments. 

In my new career I decided, I wanted to actively embrace a different lifestyle. One that centers around enjoying every day instead of thinking "someday" I'll have more _____? (joy, peace, fun, etc.)
This has inspired my new art piece, When She Simplified Her Life, her Soul Whispered Thank You.

Art available in my Etsy Shop

 Here are 2 things I'm doing to help me bring about a more simplified (and peaceful) life.
 
Get Rid of Stuff & Write Everything Down

Get Rid of Stuff

Too much stuff = stress & mess
Take a fresh look at your stuff - do you love it? If not, make it go bye bye. 
(Someone else will appreciate it.)

Look at your monthly calendar - What's taking up your time? (meetings, committees, 
clubs, projects, appointments, etc.) If you don't love them, start cutting one thing a month.
This also includes all your kid's activities.

Look at what's coming into your Inbox
Organize your inbox - set up folders in your email and create rules so emails go directly into them. This is great for sales, coupons, newsletters, bills. When you're ready to deal with them, they're in one folder waiting for you, instead of clogging up your inbox. Unsubscribe from anything that isn't needed.

Look at your closets, your shelves, your garage, your purse - what needs to stay, what needs to go?

Look at your books, magazines, subscriptions. Are you excited to read them or do you feel stress when you think about them? If it's stress, get rid of them.

Write Everything Down

 We love to fool ourselves that we can remember things but all that does is cause you pressure as you try to remember or, even worse, that horrible feeling when know you've forgotten something.

Every time you have a future appointment, future due date, have to call someone, have to buy something, you're waiting for a response by a certain date, put it in your calendar or To Do List. Once you move it from your brain and put it on paper or electronic reminder, you'll be amazed at how peaceful you'll feel knowing it's in one place (and that's not your already overloaded brain). It's also helpful to write the next day's to-do list before you go to bed so the minute you start to relax, every single thing you need to remember doesn't start swirling around your brain. 
(Also keep a notepad by the bed for anything you forget).


Here's to a more simplified and more lovely life.
Our souls will thank us.

Love, Steph

DIY Valentine Collage Tray - a lifetime of love and encouragement

Working on a Valentine's Gift for my mom and thought I'd share this Valentine Collage Tray
My mom has always been my "number one cheerleader" and I wanted to let her know that I appreciate her lifetime of love and encouragement, not just to me, but to everyone she meets.


A few ideas of Materials to Use for Collages

Paper: Scrapbook, Wrapping, etc.
Embellishments: Buttons, Flowers, Ribbon, String, Metal
Letters: Cut out using scissors or a Cricut or Silhouette 
Favorite Quotes
Stamps, Punches, Stickles
Greeting Cards/Magazines
Photos: Scan your favorite photos and include them. 
Converting them to black and white also adds a special touch.

There are really no rules - just pick stuff you like and can glue down.

Start with a Tray
I used a 12x12 one from 7Gypsies
 You can use old shadowboxes, or anything with dividers.


Decide on Your Colors
Pick 3 or 4 colors to use for the piece. 


Measure and Cut Background Paper
Cut several of each color and then play with the layout.


Start Making the Collages
I find it easier if I don't overthink it. 
Let it come organically - just focus on one box at a time and create a little collage
 that depicts a feeling you want to share. Keep adding layers and 
embellishments until you like the look and then move onto the next.


 Don't glue the individual collages into the tray until the end.
(that way you can move them around if you need to for the overall look)


I shaded the edge of each piece with black ink to give it a more cohesive look. 
Also used pop-ups/mounting squares to add dimension on a few pieces. 


When you've laid them out in a pattern that you like, start the gluing. 
(I moved mine around quite a bit until I got the look I wanted.)
I used general tacky glue and pressed them down firmly.


Happy Valentine's Day!
Love, Steph


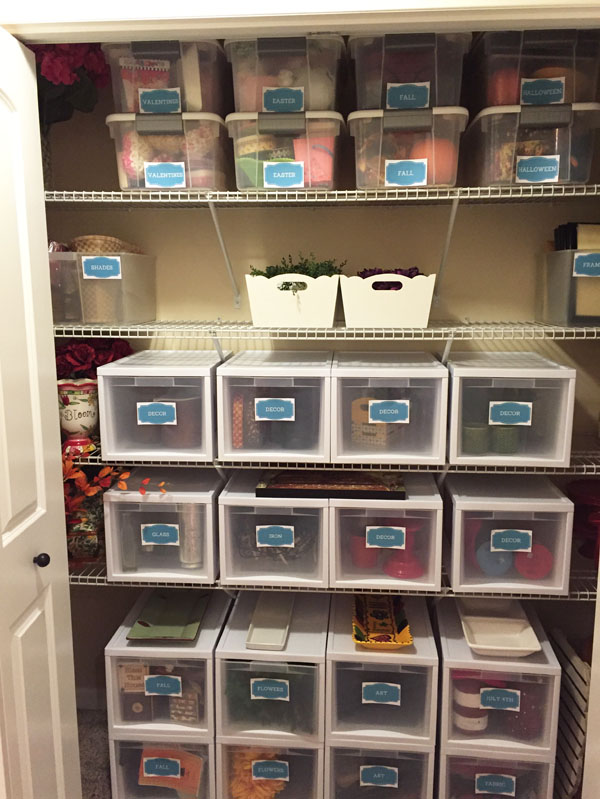
Win Your Closet Organizing Battle in just 6 Steps (no matter what type of closet)


                           Turn this...................................................................... into this
 

I've always found it fun to to change out my decor each month. 
So I really loved that my new house had a very large hall closet to store all things decorating.
However, it has since morphed into a catch all for everything - all piled on top of each other.
If I ever needed anything, I usually knocked over several other things in the process.

I want to share with you my general plan for organizing closets. This example is for a hall closet, but the steps will work for any closet or storage area. 

Measure the closet and sketch out a general plan for where you'd like things to go. Think about how often you use things and put the regularly used items in a central easy-to-get-to place. Once I did this, then I bought storage bins.
It's important to purchase the storage items you want AFTER you've measured and figured out what will work best for your closet. Don't buy storage first, even if it's super cute. (I know this is sooo hard)

I ended up purchasing these Modular Drawers. I got Medium Tall, but there are all sorts of
sizes to fit your needs. You can get them on Amazon, Ebay, etc.


I only bought a few (haha).


Empty out Everything.
(This is a much easier method than trying to move things around)
Sort everything into categories (holidays, type of decor, etc.) 
This is also a great time to weed out anything you don't love.


Play around with the layout a bit. This part will take the longest as you move things around to get the most out of the space. Start putting your sorted items into bins.

Then label the bins.  
(If you can't quite decide what to label things, just use post it notes until you like the categories.) 
Let me tell you about a FABULOUS website called Canva that allows you to create all sorts of forms and graphics and labels for free. They also have graphics you can buy for only $1.
 I went in and found a cute label, typed up my titles, downloaded it,
printed them on my Full Sheet Labels and then cut them out.
Love, Love, Love this site.


Label all the bins.


Action Steps

Measure & Sketch out Plan
Empty
Sort & Organize
Discard
Put in Bins, etc
Label


Happy Organizing!
Love, Steph


Follow me on Pinterest for lots of organizing and creative ideas.