Showing posts with label Creativity. Show all posts
Showing posts with label Creativity. Show all posts
DIY Bee Bathroom Decor
My Guest Bathroom is designed around the theme of Bees. It started
when I created some Bee Art and then I've been collecting and creating
since then.
Here's my new DIY Bee Collage:
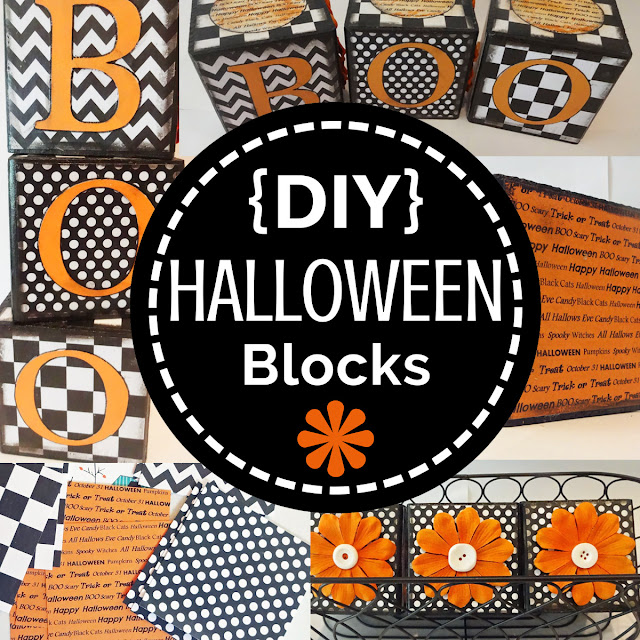
Halloween Block Decorations - DIY Yourself some Unique Decorations
Halloween is huge in our neighborhood... in our town... in our house. The leaves are starting to change and the air is getting a little crisper at night so I'm feeling inspired to make some decorations.
DIY Upcycled Cabinet Door = Easy Decorating
Do it Yourself Home Decor by taking an old Cabinet Door and creating an easy decorating piece that can be changed out to suit your decor, seasons and holidays.
Fun & Festive Christmas Wreaths (that you can make yourself)
Check out all these cute and creative Christmas Wreaths.
Lots of fun ideas that you can make yourself.
It's Not the End
We tend to look at life from a very narrow perspective - seeing only what's right in front of us.
Wondering if a problem will ever end.
Will I get through this?
Pain. Grief. Sadness. Loss. Stress.
Not being able to see the light at the end of the tunnel.
It helps to remember that problems are temporary and that everything will ultimately work out.
But often it's not the timing we hope for.
Everything will be alright in the end. If it's not alright, it is not the end.
It's not the end. You got this.
Cute (and Easy) Garland Project for Valentine's or any Holiday
I've been feeling a little crafty this past month so here's a cute little garland project I put together.
#paperjunkie It'll add a fun touch to your holiday decorating and you can make one for any holiday or event you want.
Valentine's Day Heart Garland
Choose 3-5 coordinating sheets of your favorite scrapbook or vintage paper.
Cut out shapes (hearts, circles, stars, pumpkins, etc). Cut 2 pieces (front & back) for each; vary sizes if you want. I used my Silhouette, but you can also trace/cut with scissors or use various punches.
Determine how long you want your garland (add several extra inches on each end for hanging).
Measure and cut thin string or ribbon.
Glue front and back of each shape with string on the inside. Press firmly so each side is glued securely. Vary colors/patterns and sizes.
I hung mine on my sofa table - used clear command hooks and attached the garland to it.
I did another for Christmas, too. You can make garlands for Easter, Halloween, July 4th, etc. Also a terrific project to do with your munchkins.
Have a creative and fun week!
Love, Steph
Make sure to follow CreativeSteph13Art on Instagram:
Gallery Walls - create your own unique vision
While taking care of my mom a few weeks ago, I was organizing things (like that's a surprise) and got to looking at her hallway and the bunches and bunches of photos and frames. Over the years, as more frames were added, it got to be a bit of a jumble. So we started talking about creating a photo gallery wall.
Step 1 - Pare Down the Photos
Remove any that are faded, blurred, or don't "bring you joy" to look at everyday. Had a few old favorites so I scanned them and was able to restore them.
Step 2 - Matching Frame Color for a more Polished look.
Some
were already black so I pulled out my spray paint and painted the other frames we wanted to keep. Also took the glass out of the frames for a lighter look.
Step 3 - Choose Your Layout/Design
Wanted a simple, classic look so went with a Parallel Split Display where all the upper frames aligned at the bottom and all the lower frames aligned at the top. Laid out the pictures to determine what went where. Mixed up the sizes of the frames for a more interesting look.
Step 4 - The Line Up
Measured the center of the hallway and picked my bottom and top points as well as how much space I wanted between the two lines of photos (I used around 8 inches, but use your personal preference.) Used a ruler, level and painters tape to create a line.
If you have a more complicated layout, a great tip is to use brown wrapping paper to cut out your frame sizes and then play with the layout on the wall before you start hanging.
Step 5 - The Hang Up
To avoid making multiple holes in the wall I used Velcro Command Strips to hang my photos (used at least one at the top and bottom of each frame for stability). Then, with the painters tape as a guideline, started in the middle of the hallway and worked outward. Hung the bottom row first and then staggered the top row. This also makes it so easy if you ever want to change out frames/photos.
Mom was so happy with the result. Yay!
We went with a straight photo wall but there are so many other fun Gallery Wall Ideas.
Via Shanty 2 Chic
Via Mary Schannen
Have fun creating your own gallery wall!
Love, Steph
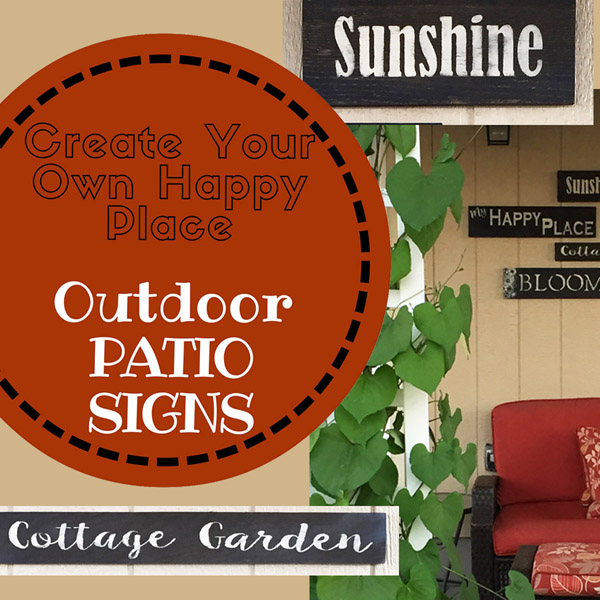
Create Your Own Little Happy Place with some DIY Signs
Create your own little happy nook with some DIY Signs. We all need a place for ourselves. I created mine next to my newly planted Cottage Garden (it's a tiny garden now, but it'll grow). I love sitting out there and just enjoying the flowers and sunshine. You can create yours inside or outside - as long as it's a place you can go to and find relaxation and peace.
Start by picking a few phrases that make you smile. Little reminders or happy things that take you to a special cocoon inside a busy bustling world. This may take a few days - enjoy the process of identifying those words or phrases that give you a feeling of bliss. Then start creating your signs - here's the process I used...
Picked a bunch of random sized wood. I first stained the wood with a mixture of Tea/Coffee and then used a Vinegar/Steel Wool mix to Oxidize it (instructions here). You could also use any color of stain or paint.
Stencils - I cut out phrases on my Silhouette (this gave me the most options of fonts and sizes). I also had some plastic letter stencils. (You can also just purchase pre-made stencil phrases at any craft store). To position the stencils, I did some measuring and dividing (please, no more math) and then used a white Stabilo pencil (or any pencil that you can easily wipe off later), to mark the wood to help line up the stencil.
Taped down stencil with painters tape. To hold down some of the little inside edges of the letters I used my a clear tape runner.
I used Acrylic Paint (Titan Buff) and a make-up sponge. You don't need any fancy tools or daubers. The secret is to lightly dab your sponge into the paint and then lightly dab your stencils. Take your time and do several layers. This way the paint doesn't seep under the edge of the stencil and you get messy and blobby (yes, that's my technical term) edges. Patience and lightness is the key.
Once the paint is dry, I gently lifted the stencil off the wood. If needed, you can fix anything with a small paint brush. Once it was really dry, I gently wiped off the white guide marks.
Even though these will be hung in my covered patio, I still wanted to protect them from the elements. I used a product called NeverWet. After applying this, I sprayed several coats of clear matte finish and let them dry thoroughly.
To help determine the layout, I placed the signs on my floor, moved them around, and took pictures until I found the one I liked best. This helped me when I was outside hanging them - I just referred to the photo for the layout and spacing.
I'm experimenting with the hanging method. I may add more signs in the future so I don't want to have nail marks all over the side of my home. I put a bunch (4-5 per sign) of Velcro Command Strips on the back of each of the signs. So with my photo of the layout, the signs and a level, I stuck them on the patio wall.
Project Steps
Select Happy Phrases
Pick and Stain Wood
Select and/or Cut out Stencil
Paint
Seal
Hang
Enjoy
Hope you find your very own Happy Place!
Love, Steph
Easy and Fun Easter Letter Project - add a splash of creativity to your Spring
Supplies
Cardboard Letters
Scrapbook Paper (3-4 coordinating colors)
Craft Paint
Mod Podge
Flower Punch
Buttons
Glue
Stamping Ink
Cardboard Letters - you can get them at most craft stores. I got mine at Hobby Lobby. I selected letters for Easter, but you could also choose Spring, Bloom, Bunny, etc.
Choose paper for each letter.
Reverse the letter and trace it on the back of the paper (to avoid pencil marks) and cut out.
Paint Letters White (regular old craft paint).
Glue paper letters using Mod Podge or Gel Medium; use 2-3 coats.
Dry thoroughly between coats making sure the paper edges are securely glued down.
Punch out flowers from coordinating accent paper.
You could also purchase paper or silk flowers
You could also purchase paper or silk flowers
Lightly edge each letter with black ink to add dimension.
Glue Flowers - I chose to just decorate the bottom of the letters,
but use your creativity and make it your own.
Add buttons to accentuate.
Action Steps
Paint Cardboard Letters
Cut Paper to Match Letters and Glue
Edge with Ink
Add Flowers and Buttons to Decorate
Display
Happy Decorating!
Love, Steph
DIY Custom & Personalized Journals
I love blank notebooks and journals and have all sorts of them. I use them to sketch out art ideas, to track what I plant in the garden, to organize items for my house, class notes, favorite quotes, etc. However, they can get a bit pricey so I decided to create my own.
Supplies
Composition Notebooks
Back-to-school time typically has the best price so I stocked up.
Paper
I used 4 sheets of coordinating paper (2 of one pattern and 2 of another). Depending upon the size of
your book, you can use 12x12 or 8 1/2 x 11 scrapbook paper or decorative wrapping paper. For best
results use a heavier paper.
Glue & Paint Brush or Foam Brush (1 inch)
You can use rubber cement, Mod Podge or tacky glue. I found the easiest to use was Mod Podge.
Just put it on thinly so it doesn't buckle the paper. If it does, just wait till it dries to continue - it usually flattens itself out then.
Just put it on thinly so it doesn't buckle the paper. If it does, just wait till it dries to continue - it usually flattens itself out then.
1. Measure Your Notebook
Height and Width of front cover.
2. Cut Your Paper
Outside Pieces - add 2-3 inches to your width and height and cut two (2) pieces.
Inside Pieces - for the inside of each cover. Subtract 1 inch from your width and height and cut two (2) pieces.
Spine - Cut one piece 3 inches wide and the height of the notebook.
My measurements were: Outside 9x11, Inside 9x7, Spine 3x9 3/4
3. Outside Cover
Using Mod Podge and paintbrush, glue paper to front cover. Align one side of the paper to the edge of the spine and smooth out (make sure to have overlap on the three remaining sides - you will fold these over). Repeat for back cover.
4. Inside Edge
Turn over book, fold in the edges of paper on the top and bottom. Glue down. Then fold over the paper on the sides of the book and glue down. (This will create a square edge)
5. Inside Covers
Align your inside piece so it covers the edges of folded over paper on the inside cover. Glue and smooth. Repeat.
6. Spine
Center the piece to cover the spine of the book. Glue down and then close up the book smoothing down the paper on the spine. (don't let the spine dry when the book is opened flat as you need a little wiggle room to close the book)
Hint: To help the paper lay flat as it's drying, you can place something heavy (I used a covered brick) to weigh it down and keep it flat.
Optional - you can gently brush Mod Podge over all the sides and edges for some additional strength. Do it in sections and let it dry thoroughly in between.
7. Decorate
This is where you can have fun and be all sorts of creative! You can leave them plain or decorate them with layered paper, ribbon, buttons, flowers or other embellishments. You can also add a label or your favorite verse.
Happy Creativity!
Love, Steph
Subscribe to:
Posts (Atom)


