Showing posts with label Crafts. Show all posts

DIY Valentine Collage Tray - a lifetime of love and encouragement

A Valentine's Gift for my mom. My mom has always been my "number one cheerleader" and I wanted to let her know that I appreciate her lifetime of love and encouragement, not just to me, but to everyone she meets.

Halloween Block Decorations - DIY Yourself some Unique Decorations


Halloween is huge in our neighborhood... in our town... in our house. The leaves are starting to change and the air is getting a little crisper at night so I'm feeling inspired to make some decorations.
 

Fun & Festive Christmas Wreaths (that you can make yourself)

Check out all these cute and creative Christmas Wreaths. 
Lots of fun ideas that you can make yourself.

Cute (and Easy) Garland Project for Valentine's or any Holiday


I've been feeling a little crafty this past month so here's a cute little garland project I put together.
#paperjunkie  It'll add a fun touch to your holiday decorating and you can make one for any holiday or event you want.

Valentine's Day Heart Garland
Choose 3-5 coordinating sheets of your favorite scrapbook or vintage paper.
Cut out shapes (hearts, circles, stars, pumpkins, etc). Cut 2 pieces (front & back) for each; vary sizes if you want.  I used my Silhouette, but you can also trace/cut with scissors or use various punches.


Determine how long you want your garland (add several extra inches on each end for hanging).
Measure and cut thin string or ribbon.
Glue front and back of each shape with string on the inside. Press firmly so each side is glued securely.  Vary colors/patterns and sizes.
I hung mine on my sofa table - used clear command hooks and attached the garland to it.


I did another for Christmas, too.  You can make garlands for Easter, Halloween, July 4th, etc.  Also a terrific project to do with your munchkins.


Have a creative and fun week!
Love, Steph

Make sure to follow CreativeSteph13Art on Instagram:

DIY Tissue Box Covers - make functional cute, not boring!


Customize your home decor with a little DIY and make your own Tissue Box Covers.  There are all sorts of options to choose from - wood, paper, material... I'll show you how I made one with scrapbook paper and I've included several other creative ideas to help inspire you.

 I chose some metallic scrapbook paper to make a cover to match my powder room colors and used an old clear tissue box cover as the base. You can find inexpensive ones at thrift or dollar stores.

 Measured and cut out the sides and the top.

Four individual sides. One top (with the opening traced) and a bunch of decorative circles.

 Used Mod Podge to glue down the sides first. While that was drying, got started on the top.

For the top I carefully cut out the middle of the opening leaving enough to cut and fold back individual tabs to cover the entire inner edge and Mod Podged them down. You can use clothespins to hold the tabs down while it dries. Note: If you want to just trace and cut out the circle opening, make sure to use a little extra Mod Podge so it doesn't lift up when you pull out a tissue.

Mod Podged the circles onto the sides.
You can also decorate with labels, flowers, accents, embellishments, etc.


More IDEAS!

Book Pages and a Chalkboard Sign via Make the Best of Things

Wooden Mod Box Cover via Crafty Nest

 Sew a Decorative Cover via Make it and Love it

 Lego Box Cover for the little ones via Dream a Little Bigger

Tutorial for Cardstock or thin Cardboard for ultimate customization via Split Coast Stampers

Happy Creating this week!
Love, Steph

You Can Make Your Own Vintage Sign

I love the look of Vintage Signs, so I thought I'd create something of my own,
customized for me, at just a fraction of the cost.

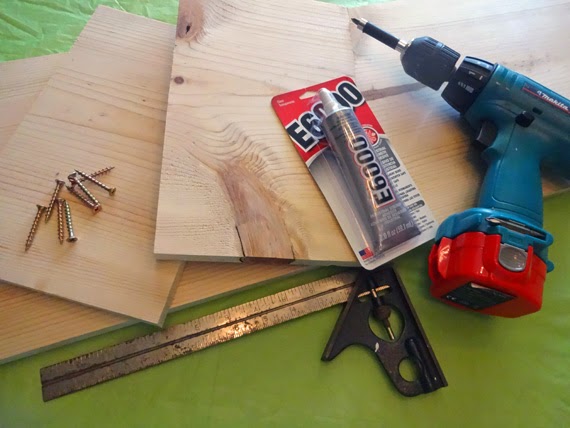
All I needed was a few pieces of scrap wood, some paint and contact paper.
I wanted a sign for my art studio door of the Number 13. It's part of my company
name and I've always loved it. (no superstition for me :)

I dug through my scrap wood pile and found 4 boards (3 1/2 inches wide) and cut them to a 17 inch length. Any size wood will do - just depends on how big you want your sign to be. Pick something relatively thin so it's not too heavy - probably around 1 inch works best.

 Lined up the wood and on the back I used some smaller pieces to nail
everything together and stabilize it a bit more. 

Assembled the wood. A little glue, a few nails. 
Sanded it just a little bit because I wanted it to look very vintage. 

  A talented friend told me about printing letters/numbers on contact paper so I thought I'd give it a try. I discovered the ink from my printer didn't want to stick to the contact paper,
so I just printed the numbers out on legal size paper, taped them to the contact
paper and cut it out with scissors (worked great).


I chose flat black paint for my base coat. You could also use a stain.
Just remember the base coat will be the color you want your letters/numbers/words to be. 

Once the base coat was dry, I wanted to line up the numbers evenly so I drew a very light line with my t-square. (It was painted over with the top coat)

Peeled the contact paper off the number and lined them up on the wood. Because the wood was so rough, they wouldn't stick very securely. I just pressed them down and they stayed in place (sort of).

For my top coat, I chose ivory flat paint. I painted it very gently with the foam brush. I held down the numbers with my fingers and brushed from the inside out of the contact paper in order to get a crisper edge. Used a light coat of paint as I wanted it to look distressed.

Once it dried, I removed the contact paper, and sanded it lightly.

Didn't want to put a hole in my studio door, so I turned to my
trusty Velcro Command Strips and a level to hang them.


Love it!!!
Happy Creating!
Love, Steph


Subscribe to CreativeSteph13 and get your FREE copy of my eBook - Essential Organizing Tools


Easy & Elegant Paper Easter Eggs


Plastic Eggs + Paper + Glue = Easy & Elegant Paper Eggs

Create a basket or bowl full of elegant paper eggs. Use them for Easter or to accent a room.

Supplies:
Plastic Eggs (Medium to Large Size)
Paper (scrapbook, Wrapping Paper, etc)
Mod Podge Glue (Lustre Finish)
Foam Brush


Start with your paper. I selected a few complementary colors/patterns. But you could also go with one pattern for all the eggs. You'll probably only need 2-3 sheets depending upon how many eggs you cover.

Cut, tear or use punches to get your paper into small pieces. 
I cut some with decorative scissors, punched some out with a mini round punch, and cut out thin strips for the rest. (The thin strips were the easiest to apply).

 I sprayed my pieces lightly with a fine mist of water before I glued them.
It helped make the paper a little more malleable. 

Dip your brush into the Mod Podge (I used the Lustre Finish so there would be a shine to the eggs) and start placing little pieces onto the egg. Overlap the pieces as you glue.

I found if I worked on one half of the egg at a time, and let it dry a bit in between, it was much easier to work with and not so sticky. I put them on wax paper while they dried.

Once they're dry, you can leave plain or decorate with stickles, buttons, ribbon, whatever you like.

Display them in a cute basket or bowl.

Hope you have a creative week!
Love, Steph


Create a Custom & Cute Computer Shelf in a few hours


I don't know about you, but I NEVER have enough room on my desk. Papers seem to multiply and even with having my keyboard and mouse under the desk, I still felt like I didn't have any working space.

So, I decided to create my own computer shelf and, of course, it couldn't be boring AND had to match the chocolate/teal colors in my office.  Hit Home Depot and a scrapbook store to get started.

Supplies
  • Board (6' long x 12"wide x 1" thick) 
  • 8 Screws (at least 1 1/2 inches long)
  • Glue (used E6000 but any type of wood glue would work also)
  • Square (to make sure it was square - haha)
  • My trusty Makita Drill/Screwdriver
  • Scrapbook Paper (at least 15-20 sheets of coordinating colors/patterns)
  • Mod Podge & Foam Brush
  • Heat Gun (optional, but it helped with the drying time)
  • Adhesive Felt Pads

My desk is 48 inches wide so I wanted the shelf to be 46" wide x 8" high (wanted to be able to fit my stuff underneath, but not too wide that I'd worry it slip off the side of the desk). Home Depot very kindly cut the wood for me (one 46" piece and two 7" pieces). Note: Figure out what size/height works for you and have the wood cut accordingly - I wanted a taller shelf but you may prefer something shorter.

Glued the sides to the top and then added the screws for stability. Used the square to double check the corners. One of the sides wasn't quite level so I sanded it a bit.

Cut my scrapbook paper into a bunch of strips (different widths and lengths).

Using the Mod Podge, started gluing the strips, layering them and varying the pattern. I wrapped them around the top and sides. (Did the underneath side last). 

Kept layering.

More layers until the whole thing was covered and I liked the look. Took about 2 hours. Then I put two more coats of Mod Podge on the entire shelf for some extra protection (you could also use some gloss spray paint for extra sealing).  Let it set for an hour to make sure everything was dry and that everything looked glued down. (If you see any pieces not completely covered, just pull out more Mod Podge and give it another layer). Added the Adhesive Felt Pads to the bottom

Finished!!! It turned out soooo cute! Was able to put my sweet little Martha Stewart Supply Drawer underneath with my router on top. Will probably put some project boxes underneath - still working on them.


Hope the creative bug hits you this week!  Love, Steph


Stay in Touch by following me on...