A To Do List Art Piece that will Make You Happier Every Day

I love To-Do Lists (like that surprises you). I've got lists for everything. There's something about those little check marks that make me feel like I've accomplished something (and that I actually have a little control over my hectic life). But even if you complete your list, it's only for a short time, and you'll only to have more items to complete later on.

So how about a To-Do List that makes you happier every day? 
I put together some of my favorites in a bright mixed media art piece. Focus on these each day and, you can have a life that's full of more joy, and more peace, and whole lot more happiness.

Encourage Someone 
(a compliment, a happy word, people love to be noticed)
Laugh A Lot 
(there's usually something funny - even in the not-so-funny moments)
Try Something New 
(keep learning, be bold, get out of your rut)
Say Thank You 
(such a lost art - if you don't express gratitude, you're expressing ingratitude)
Listen with Your Heart 
(not just your ears, look beneath the surface of the words) 
Enjoy the Little Things
(make a concerted effort to look for moments of joy)
Be Yourself 
(it's exhausting to keep a mask on - put it away and let the real you shine through)


To Do List by CreativeSteph13

Hope you accomplish everything on THIS TO-DO List.
Love, Steph

Set Yourself Free...When She Let Go of the Past Her Heart Whispered Thank You - New Mixed Media Art

The past can often seem comfortable and familiar, but it can also hold us back. Letting go helps us to move forward. Deciding. Choosing. Committing. To. Let. Go. is in our hands (and in our hearts). 

In creating this art piece I was inspired by some of the quotes below.
Letting go is so freeing (but soooooooo hard).


The truth is, unless you let go, unless you forgive yourself,
unless you forgive the situation, unless you realize that the situation is over,
you cannot move forward.
Steve Maraboli

We must be willing to let go of the life we’ve planned,
so as to have the life that is waiting for us. Joseph Campbell

When you let go, you are truly free. 
Unknown

Forgiveness is letting go of the hope that the past can be changed. 
Oprah Winfrey


We can all let go of the past. And our hearts will thank us.

Gallery Walls - create your own unique vision


While taking care of my mom a few weeks ago, I was organizing things (like that's a surprise) and got to looking at her hallway and the bunches and bunches of photos and frames. Over the years, as more frames were added, it got to be a bit of a jumble. So we started talking about creating a photo gallery wall.

Step 1 - Pare Down the Photos
Remove any that are faded, blurred, or don't "bring you joy" to look at everyday. Had a few old favorites so I scanned them and was able to restore them.

Step 2 - Matching Frame Color for a more Polished look. 
Some were already black so I pulled out my spray paint and painted the other frames we wanted to keep. Also took the glass out of the frames for a lighter look.

Step 3 - Choose Your Layout/Design
 Wanted a simple, classic look so went with a Parallel Split Display where all the upper frames aligned at the bottom and all the lower frames aligned at the top. Laid out the pictures to determine what went where. Mixed up the sizes of the frames for a more interesting look.

Step 4 - The Line Up 
Measured the center of the hallway and picked my bottom and top points as well as how much space I wanted between the two lines of photos (I used around 8 inches, but use your personal preference.) Used a ruler, level and painters tape to create a line. 
If you have a more complicated layout, a great tip is to use brown wrapping paper to cut out your frame sizes and then play with the layout on the wall before you start hanging.

Step 5 - The Hang Up
To avoid making multiple holes in the wall I used Velcro Command Strips to hang my photos (used at least one at the top and bottom of each frame for stability). Then, with the painters tape as a guideline, started in the middle of the hallway and worked outward. Hung the bottom row first and then staggered the top row. This also makes it so easy if you ever want to change out frames/photos.
 
Mom was so happy with the result. Yay!


We went with a straight photo wall but there are so many other fun Gallery Wall Ideas.


Have fun creating your own gallery wall!
Love, Steph

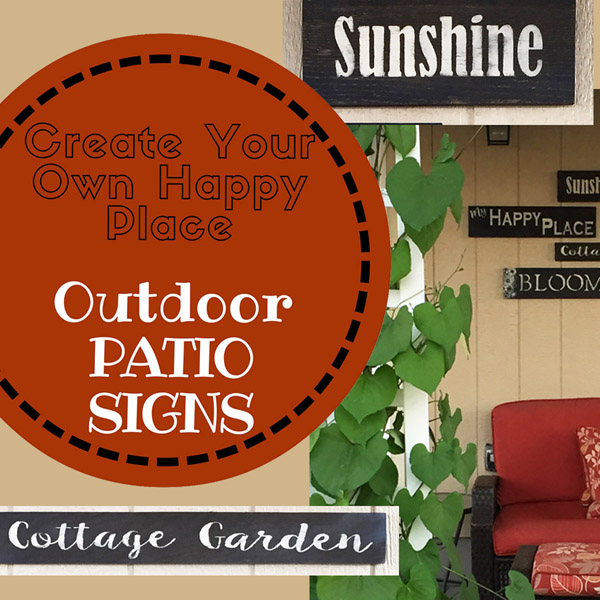
Create Your Own Little Happy Place with some DIY Signs


Create your own little happy nook with some DIY Signs. We all need a place for ourselves. I created mine next to my newly planted Cottage Garden (it's a tiny garden now, but it'll grow). I love sitting out there and just enjoying the flowers and sunshine. You can create yours inside or outside - as long as it's a place you can go to and find relaxation and peace.

Start by picking a few phrases that make you smile. Little reminders or happy things that take you to a special cocoon inside a busy bustling world. This may take a few days - enjoy the process of identifying those words or phrases that give you a feeling of bliss. Then start creating your signs - here's the process I used...


Picked a bunch of random sized wood. I first stained the wood with a mixture of Tea/Coffee and then used a Vinegar/Steel Wool mix to Oxidize it (instructions here). You could also use any color of stain or paint.

Stencils - I cut out phrases on my Silhouette (this gave me the most options of fonts and sizes). I also had some plastic letter stencils.  (You can also just purchase pre-made stencil phrases at any craft store). To position the stencils, I did some measuring and dividing (please, no more math) and then used a white Stabilo pencil (or any pencil that you can easily wipe off later), to mark the wood to help line up the stencil.

Taped down stencil with painters tape. To hold down some of the little inside edges of the letters I used my a clear tape runner.
I used Acrylic Paint (Titan Buff) and a make-up sponge. You don't need any fancy tools or daubers. The secret is to lightly dab your sponge into the paint and then lightly dab your stencils. Take your time and do several layers. This way the paint doesn't seep under the edge of the stencil and you get messy and blobby (yes, that's my technical term) edges. Patience and lightness is the key.


Once the paint is dry, I gently lifted the stencil off the wood. If needed, you can fix anything with a small paint brush. Once it was really dry, I gently wiped off the white guide marks.

Even though these will be hung in my covered patio, I still wanted to protect them from the elements. I used a product called NeverWet. After applying this, I sprayed several coats of clear matte finish and let them dry thoroughly.

To help determine the layout, I placed the signs on my floor, moved them around, and took pictures until I found the one I liked best. This helped me when I was outside hanging them - I just referred to the photo for the layout and spacing.

I'm experimenting with the hanging method.  I may add more signs in the future so I don't want to have nail marks all over the side of my home. I put a bunch (4-5 per sign) of Velcro Command Strips on the back of each of the signs. So with my photo of the layout, the signs and a level, I stuck them on the patio wall.


Project Steps

Select Happy Phrases
Pick and Stain Wood
Select and/or Cut out Stencil
Paint
Seal
Hang
Enjoy
Hope you find your very own Happy Place!
Love, Steph

Organize it Quick - 5 Steps


 Get your Mess Together & Throw Away Some of it
 Find a Box
 Paint Box
 Label Box
Put Stuff in Box

Start with a big old mess. 
Put it in a pile and discard anything that's old, not needed, outdated, etc. 
I wanted to organize my First Aid stuff and Medicines.

Find a box (the uglier the better - haha) that will hold your stuff. I had these from a thrift shop.
Pare down your stuff before finding the right box size.

Paint the box (a few coats of spray paint).

Label the box.
Design a fun label at Canva.com and print it out on Full Sheet Labels. 

Cut out the shape.

Put stuff in box.

Two cute organized boxes + more room in the drawer.

Happy Organizing!
Love, Steph

BEE Art...................Bee Happy

Bee Happy, Kind, Strong and True


Hope you'll BEE Happy this week!!! 
Love, Steph

Prints available in my online Etsy Shop