Easy and Fun Easter Letter Project - add a splash of creativity to your Spring


Supplies
Cardboard Letters
Scrapbook Paper (3-4 coordinating colors)
Craft Paint
Mod Podge
Flower Punch
Buttons
Glue
Stamping Ink

 Cardboard Letters - you can get them at most craft stores. I got mine at Hobby Lobby. I selected letters for Easter, but you could also choose Spring, Bloom, Bunny, etc.

Choose paper for each letter. 
Reverse the letter and trace it on the back of the paper (to avoid pencil marks) and cut out.
Paint Letters White (regular old craft paint).

 Glue paper letters using Mod Podge or Gel Medium; use 2-3 coats.
Dry thoroughly between coats making sure the paper edges are securely glued down.

Punch out flowers from coordinating accent paper.
You could also purchase paper or silk flowers

Lightly edge each letter with black ink to add dimension.
Glue Flowers - I chose to just decorate the bottom of the letters, 
but use your creativity and make it your own.

Add buttons to accentuate.


Action Steps
Paint Cardboard Letters
Cut Paper to Match Letters and Glue
Edge with Ink
Add Flowers and Buttons to Decorate
Display 
 

Happy Decorating!
Love, Steph

Simplifying and Soul Whispers

Beware the barrenness of a busy life. Socrates

Focus on being productive instead of busy. Tim Ferris

Never get so busy making a living, that you forget to make a life.

So many of us have busy, busy, busy lives.
Is your typical response to the question of "How are you?" an automatic response of "I'm So Busy."
We are surrounded by a culture that constantly says your life isn't good enough until it has more.
Busy is better. Do more, Work more, Buy more.
MORE, MORE, MORE.

Do you feel that you have so much on your plate that you can't enjoy or appreciate what's happening in the moment? You're always in emergency mode. You know it's too much.
You know you feel overwhelmed. You know you want something better. 

In my old job I use to joke that I lived in the future, because I was always working on projects months away and planning and organizing things for future days. I rarely thought of the current moment, only of future moments. 

In my new career I decided, I wanted to actively embrace a different lifestyle. One that centers around enjoying every day instead of thinking "someday" I'll have more _____? (joy, peace, fun, etc.)
This has inspired my new art piece, When She Simplified Her Life, her Soul Whispered Thank You.

Art available in my Etsy Shop

 Here are 2 things I'm doing to help me bring about a more simplified (and peaceful) life.
 
Get Rid of Stuff & Write Everything Down

Get Rid of Stuff

Too much stuff = stress & mess
Take a fresh look at your stuff - do you love it? If not, make it go bye bye. 
(Someone else will appreciate it.)

Look at your monthly calendar - What's taking up your time? (meetings, committees, 
clubs, projects, appointments, etc.) If you don't love them, start cutting one thing a month.
This also includes all your kid's activities.

Look at what's coming into your Inbox
Organize your inbox - set up folders in your email and create rules so emails go directly into them. This is great for sales, coupons, newsletters, bills. When you're ready to deal with them, they're in one folder waiting for you, instead of clogging up your inbox. Unsubscribe from anything that isn't needed.

Look at your closets, your shelves, your garage, your purse - what needs to stay, what needs to go?

Look at your books, magazines, subscriptions. Are you excited to read them or do you feel stress when you think about them? If it's stress, get rid of them.

Write Everything Down

 We love to fool ourselves that we can remember things but all that does is cause you pressure as you try to remember or, even worse, that horrible feeling when know you've forgotten something.

Every time you have a future appointment, future due date, have to call someone, have to buy something, you're waiting for a response by a certain date, put it in your calendar or To Do List. Once you move it from your brain and put it on paper or electronic reminder, you'll be amazed at how peaceful you'll feel knowing it's in one place (and that's not your already overloaded brain). It's also helpful to write the next day's to-do list before you go to bed so the minute you start to relax, every single thing you need to remember doesn't start swirling around your brain. 
(Also keep a notepad by the bed for anything you forget).


Here's to a more simplified and more lovely life.
Our souls will thank us.

Love, Steph

Win Your Closet Organizing Battle in just 6 Steps (no matter what type of closet)


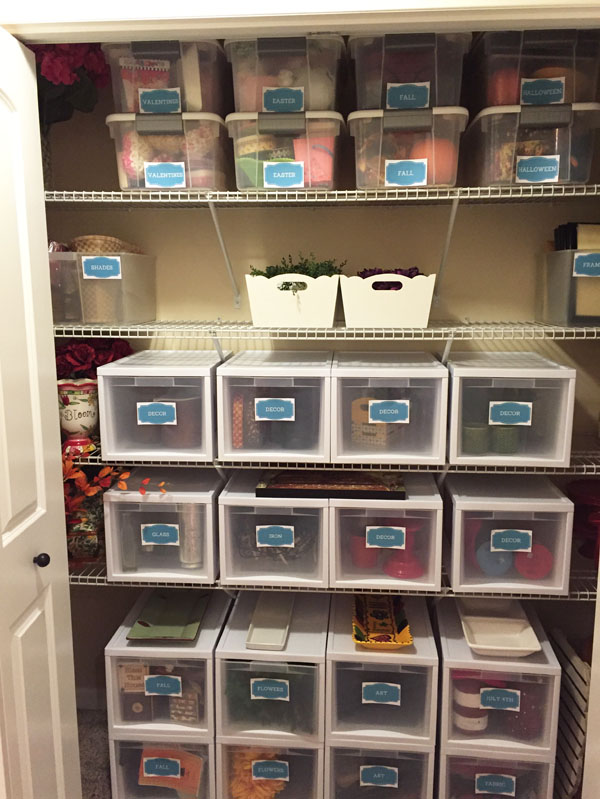
                           Turn this...................................................................... into this
 

I've always found it fun to to change out my decor each month. 
So I really loved that my new house had a very large hall closet to store all things decorating.
However, it has since morphed into a catch all for everything - all piled on top of each other.
If I ever needed anything, I usually knocked over several other things in the process.

I want to share with you my general plan for organizing closets. This example is for a hall closet, but the steps will work for any closet or storage area. 

Measure the closet and sketch out a general plan for where you'd like things to go. Think about how often you use things and put the regularly used items in a central easy-to-get-to place. Once I did this, then I bought storage bins.
It's important to purchase the storage items you want AFTER you've measured and figured out what will work best for your closet. Don't buy storage first, even if it's super cute. (I know this is sooo hard)

I ended up purchasing these Modular Drawers. I got Medium Tall, but there are all sorts of
sizes to fit your needs. You can get them on Amazon, Ebay, etc.


I only bought a few (haha).


Empty out Everything.
(This is a much easier method than trying to move things around)
Sort everything into categories (holidays, type of decor, etc.) 
This is also a great time to weed out anything you don't love.


Play around with the layout a bit. This part will take the longest as you move things around to get the most out of the space. Start putting your sorted items into bins.

Then label the bins.  
(If you can't quite decide what to label things, just use post it notes until you like the categories.) 
Let me tell you about a FABULOUS website called Canva that allows you to create all sorts of forms and graphics and labels for free. They also have graphics you can buy for only $1.
 I went in and found a cute label, typed up my titles, downloaded it,
printed them on my Full Sheet Labels and then cut them out.
Love, Love, Love this site.


Label all the bins.


Action Steps

Measure & Sketch out Plan
Empty
Sort & Organize
Discard
Put in Bins, etc
Label


Happy Organizing!
Love, Steph


Follow me on Pinterest for lots of organizing and creative ideas.

Stormy Days and Sunshine Art

With gray days comes lots of time in the studio and bright cheery art. (now available in my Shop)

We've had a BIT of rain here for the last several months/years/decades days.
I love that feeling of being wrapped up in a cocoon of warmth
when I'm all tucked inside and a storm is raging outside.

Don't friends and family create their own cocoon of warmth for us?
Even with storms raging all around us, they make the days much brighter.


A friend is what the heart needs all the time.
Henry Van Dyke


Hope you feel warm inside your own cocoon this week!
Love, Steph

5 Steps to Organize Your Paperwork

 Paperwork - it never seems to go away. 
Even in our "electronic" world, we are inundated with too much paper
In just a few steps, you can learn to organize and manage your paperwork and create a workable system to keep you from constantly searching for or stressing about that piece of paper you need. 


1. Gather Paper

Start the Hunt: Search through drawers, piles on the counter, stuff in your purse, all your nooks and crannies. Gather all your pieces of paper and put them in one ginormous big pile (preferably on an empty table or counter or even the floor). You just need room to sort things.


2. Start Sorting

Take each piece of paper and start sorting it into smaller piles. Don't worry too much about final categories at this point - you just want to get them in similar groups. Use post it notes to help you with sorting. As you sort, you'll start seeing patterns and groupings and this will help you determine your final categories.

A few basic Categories to get you Started:

Action
Misc
Projects
Shred
Recycle


Additional Category Ideas: Read, Receipts, Inspiration, Travel/Places to Go, Kids/School, Activities, Work, etc.
Create categories that fit your life. ex: I have ones for Blog Ideas, Art Inspiration, etc.
Don't make too many categories. Just keep them broad.

Too much detail = confusion remembering = lack of incentive to file anything = harder to find things

Misc. is a great catch all for things/categories you're not sure about.  Remember, don't try to over-sort and over-categorize.


3. Create Your Folders and Bins and label them.

Folders for smaller categories and bins for larger categories. ex: I have a large bin for all my travel and adventure brochures and ideas. You can use clear plastic folders, manila folders, cute cloth storage bins...choose something that makes you smile and will be EASY to access.

Note: Also create a larger Waiting Bin - this is the ONE (and only) AREA you will hold your papers as they come into the house before you sort them.


4. Go Through Each Pile

Go through each pile starting from the top. Just touch one paper at a time. Ask yourself... Shred? Recycle? Action? File? Misc? Put them in the corresponding folder or bin.


5. Maintenance

So in a perfect world, the moment a piece of paper drifts into our life, we'd immediately take it and file it in its correct location. Sigh! I don't live in that world. Well, only in my little label maker dreams.

In reality, you've got to figure out something that is manageable for you and that you can do easily and regularly. If it's not simple, we won't do it.

Here's my solution:

As paper comes in, only pull out the items you HAVE to RESPOND to (bills, permission slips, etc) and put those items in your Action folder. These items have first priority and because they're in one place, you'll never "accidentally" lose something.

Set up and use the Waiting Bin for all your other papers to hang out until you get to them. If you have to find a piece of paper, it'll be waiting for you there.
 
Take a day once or twice a month (probably when you pay your bills) to handle the rest of the paper in the Waiting Bin by repeating Step 4.


So, if you have to search for something, it will be in one place.
If you want ideas for travel, or inspiration for your home, or projects, 
or things to read, it will be in one place.


More Ideas for Organizing Paper 


Reduce paper by setting up bills on auto pay and going paperless.

Receipt Folder - place all your receipts in a small expanding folder sorted by month.
 (you can usually get an inexpensive one at the Dollar Store or in the Target dollar bins).  
Shred anything not needed at the end of the year.


Happy Organizing
Love, Steph

Peanut Butter Brownie Trifle - a little bit of heaven for the Christmas Holidays or just whenever.

Peanut Butter + Chocolate - what more could you wish for?

This is one of my absolute favorite desserts from Taste of Home
It looks amazing, tastes amazing and it's easy peasy to make. 
And it serves 20 (or less, depending on how hungry you are).

Peanut Butter Brownie Trifle
1 Brownie Mix (13 x 9 pan size) (+ eggs & oil)
1 Peanut Butter Chips (10 ounces)
3-4 C Tiny Peanut Butter Cups
4 C Milk
2 Vanilla Pudding (5.1 ounces each, instant) 
1 C Creamy Peanut Butter
4 t Vanilla Extract
3 Cartons Cool Whip (8 ounces, thawed)

  Preheat oven to 350°. Prepare brownie batter according to directions; stir in peanut butter chips.
(Don't forget to stir in the chips - this is the part I always seem to forget
and have to quickly pull the pan out of the oven to add them in.)
 
Bake in 13x9 baking pan 20-25 minutes or until a toothpick inserted near the center
comes out with moist crumbs (do not overbake). Cool & cut into 3/4-inch pieces.

Cut peanut butter cups in half; set aside 1/2 C for garnish. 

In a large bowl, whisk milk and pudding mixes for 2 minutes (mixture will be thick).
Add peanut butter and vanilla; mix well.
Fold in 1-1/2 cartons Cool Whip.

In a large Glass Bowl - three layers: Brownies, Peanut Butter Cups, Pudding Mixture (repeat twice). Cover with remaining Cool Whip and garnish with reserved peanut butter cups.

Refrigerate until chilled. 
YUM
YUM
YUM

Happy Sugar Coma!
Love, Steph
 

5 Quick Organizing Projects for Your Home

Quick.
Simple.
Not overwhelming.
Sounds good, huh?
Here are a few projects to help you focus on one area in your home that needs to be organized.
Sometimes tunnel vision is a good thing. 
Focusing on one small area helps us to not start hyperventilating over the BIG picture.

And how good will you feel to cross something off your list?


Happy Organizing (remember to take baby steps)

Love, Steph