Let's Get Organized: Laundry Room Cleaning Supplies


Cleaners, Cleaners and more Cleaners.

Digging through cabinets in hopes of finding the right cleaner.
Not knowing what's back there. Are there duplicates? Probably! Stuff you don't use? Definitely!
I wanted a way to have easy access to my supplies and keep them neat at the same time.
 
Discovered this great Lazy Susan at Amazon that is sturdy, flat and can hold quite a bit. There are different sizes available, but after measuring my cabinet, I purchased two of the 12" turntables.

I find it easier to organize when I pull everything out so I can see what I have. I can easily see what to keep, what to trash and what can be grouped together.
And THEN I can start fresh.


As I went through all my supplies, I decided I wanted to use three boxes for bulk storage of smaller items and keep them a little neater (Hand Soap Bottles, Sponges, and Extra Rags).

Inexpensive storage boxes from Ikea made cute. You could also use photo boxes or baskets.

Before assembling the boxes I covered the front with scrapbook
paper - a little glue was all that was needed.

After assembling the boxes, pulled out my Martha Stewart Adhesive Bookplates.

 
 Printed up my categories on white card stock in a cute font (Love Letters),
cut them out and slid them into the bookplate.

 From a jumbled mess to THIS!  Everything is so easy to find.

Have you found an item that has really helped you with organizing? Share in the comments below!

Happy Organizing!
Love, Steph


Join me for more organizing tips.
 Subscribe to CreativeSteph13 and have my posts delivered directly to your email inbox.


Conversation Techniques to Building Deeper Relationships


My dad ordered a book and we received it a week after he passed away. It was called Flourish: A Visionary New Understanding of Happiness and Well-being by Dr. Martin Seligman.  FLOURISH - what a perfect word to sum up the life my dad wanted to live. He was all about looking at life through "positive" eyes. And even with all his health issues, he chose to live a life full of joy, full of enjoyment, full of laughter....just full!

I read this book and it was so powerful. Part practical wisdom, part self-help with a lot of scientific studies to back it up. It was slow going for me (felt like I was back in college studying), but I was able to pull out many helpful gems that both reinforced my focus on a joy-filled life and opened my eyes to several new things.

One of the most interesting things I learned was... how we respond in conversations can strengthen or weaken our relationships.

How to deepen a relationship with one Conversation Technique.

When people we care about tell us about a victory, triumph or good thing that happened to them, how we respond can build the relationship or undermine it.
  • Active/Constructive  Acknowledge, be excited for them, celebrate with them. Ask questions so they relive the moment with you.
    Non-verbal: Smiling, Enthusiasm.

  • Passive/Constructive  Passively say, 'that's nice'. No further interaction or conversation.
    Non-verbal: Little to no active emotional expression.

  • Active/Destructive  Critical, negative words, pessimistic, find the fault or potential downside in the victory.
    Non-verbal: Display negative emotions, frowning.

  • Passive/Destructive  No acknowledgement of the success/victory, change subject.     
    Non-verbal: no eye contact, leave room, etc.

I've been trying it. Such a great difference.

Have a Joy-filled week!  Love, Steph


Measuring Cups - a simple way to store them


I use to dig in my kitchen drawers for the right size measuring cup until I 
came up with a practical way to store them using the inside of a cupboard.
Used one of my favorite organizing things: Command Hooks

Grabbed a pencil, level and spaced out the measuring cups evenly on the inside of the cabinet (making sure nothing got in the way of the door closing).

I have two sets of measuring cups Stainless Steel and Collapsible and I tend to use every one them when I'm really on a cooking blitz. (You don't even want to see what the kitchen looks like then.) 

 Put up the Command Hooks, waited a bit as they set, then put up all the cups. 

 
Simple, easy to use and.... no more digging around in a drawer.

Happy Organizing! 
Love, Steph


Stay in Touch by following me on...

Practical Storage for Electronic Bits & Pieces

iPods, iPhones, Cameras, Kindles, Tablets....... So many bits and pieces for all our electronics - but where to put them? My goal was to be able to get to the items easily, without actually having to see a bunch of wires in a tangled mess.

 Found some cute fabric bins at Target.

And some adhesive metal bookplates at Staples.

Created some custom labels on my computer and printed them on some Full-Sheet Labels from Avery. I love love love these as I can cut them to any size I want.

Put the paper bits (receipts, manuals, how to guides, and other paper info) into envelopes with my custom labels.

Sorted all the bits and pieces and put them into the bins along with the envelopes. Stuck on the adhesive metal bookplates - these worked perfectly on the fabric bins. Used my fab Epson LabelWorkslabel maker to print out individual labels.

So cute and functional. Wires and paperwork, along with all the other bits and pieces, are hidden from plain site, but I can grab them in a second whenever I need them.

Happy Organizing!  Love, Steph


Stay in Touch by following me on...

Create a Custom & Cute Computer Shelf in a few hours


I don't know about you, but I NEVER have enough room on my desk. Papers seem to multiply and even with having my keyboard and mouse under the desk, I still felt like I didn't have any working space.

So, I decided to create my own computer shelf and, of course, it couldn't be boring AND had to match the chocolate/teal colors in my office.  Hit Home Depot and a scrapbook store to get started.

Supplies
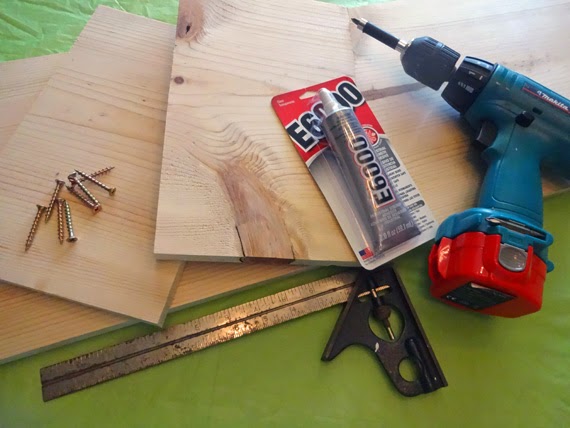
  • Board (6' long x 12"wide x 1" thick) 
  • 8 Screws (at least 1 1/2 inches long)
  • Glue (used E6000 but any type of wood glue would work also)
  • Square (to make sure it was square - haha)
  • My trusty Makita Drill/Screwdriver
  • Scrapbook Paper (at least 15-20 sheets of coordinating colors/patterns)
  • Mod Podge & Foam Brush
  • Heat Gun (optional, but it helped with the drying time)
  • Adhesive Felt Pads

My desk is 48 inches wide so I wanted the shelf to be 46" wide x 8" high (wanted to be able to fit my stuff underneath, but not too wide that I'd worry it slip off the side of the desk). Home Depot very kindly cut the wood for me (one 46" piece and two 7" pieces). Note: Figure out what size/height works for you and have the wood cut accordingly - I wanted a taller shelf but you may prefer something shorter.

Glued the sides to the top and then added the screws for stability. Used the square to double check the corners. One of the sides wasn't quite level so I sanded it a bit.

Cut my scrapbook paper into a bunch of strips (different widths and lengths).

Using the Mod Podge, started gluing the strips, layering them and varying the pattern. I wrapped them around the top and sides. (Did the underneath side last). 

Kept layering.

More layers until the whole thing was covered and I liked the look. Took about 2 hours. Then I put two more coats of Mod Podge on the entire shelf for some extra protection (you could also use some gloss spray paint for extra sealing).  Let it set for an hour to make sure everything was dry and that everything looked glued down. (If you see any pieces not completely covered, just pull out more Mod Podge and give it another layer). Added the Adhesive Felt Pads to the bottom

Finished!!! It turned out soooo cute! Was able to put my sweet little Martha Stewart Supply Drawer underneath with my router on top. Will probably put some project boxes underneath - still working on them.


Hope the creative bug hits you this week!  Love, Steph


Stay in Touch by following me on...

Excellent Adventures: Portland

I love love love to explore new places.
Many times I just pick a nearby town or city and type in the computer what to do in that town and then head out with family and friends on what we call our "Excellent Adventures".

I met up with friends in Portland a couple times this past year.
It's such a fun and funky city and there is SO much to do and see...walking around the town, outdoor musicians/concerts, great restaurants, cute little shops, etc.

A few of the places we visited last time...

 Pittock Mansion (amazing at Christmas time)

 Powell's Bookstore (every book you could think of)

Voodoo Donuts (the bacon maple is a fav)

This time the city was in bloom. We took this cool Trolley Tour that allowed us to hop on and off throughout the city (so no worries about driving or parking).


South West Park Ave
 Block after block of parks lining the avenue.

I love seeing so much color and everything blooming. 
What is your favorite Excellent Adventure?

-Steph

Fabric Covered Bulletin Board

I love to pin things on a bulletin board. Probably why I seriously love the virtual bulletin boards of Pinterest. Check out my Pinterest Boards here. I wanted to add some bulletin boards to my Art/Craft Studio to pin up inspirational pieces or quotes. I didn't want a very big board - just something to tuck underneath my shelves.

Supplies
Cork Board(s)
I used two Quartet Bulletin Boards 5.5 x 14 - found them on Amazon
Fabric
Staple Gun
Velcro Command Hooks

Cut out your fabric a few inches larger than the board.

Line up the print (if needed). Staple the sides first and finish off the ends like you're folding the corners when you wrap a present. Trim any excess fabric.

Place your Velcro Command Hook on the back of the board. Because I was putting it directly on the fabric, I used my staple gun to secure it a bit more.  
What's nice with these is you can just pull the Velcro pieces apart and
adjust them to make sure everything hangs straight.